72dpi vs. 300dpi

After a few guesses of attempting to guess what dpi stands for I’ve concluded that it is an abbreviation for Dog Pee Incidents. However, the intellectual internet has yet again taught me something new; Dpi stands for dots per inch.

What’s Dpi?

Dots per inch refers to the print on posters, banners, and several other printable objects that use dots of ink per inch to determine the quality of a printed image. In simpler terms, the higher the dpi the more detail would show in the finished printed product.

DPIs used for Printing and Web

The DPI may have to be altered depending on how the designer will exhibit his or her work. If the designer chooses to print their work, they must use a DPI of at least one hundred and fifty (typically three hundred.) It is important to have a  high dpi otherwise suffering of one’s self is guaranteed due to the poor quality If the designer chooses it to add their image on a blog it would be ideal to use a DPI of 72.  This is because it is considered the standard dpi for web images.

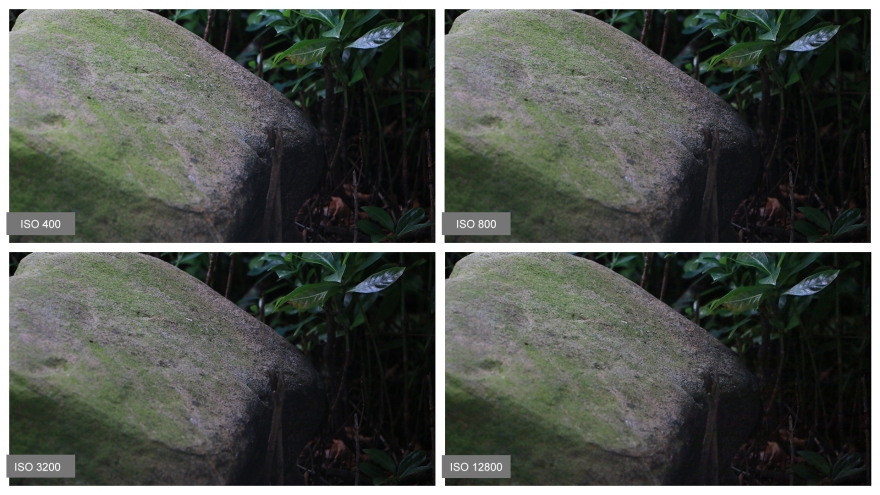
  Resolution also plays a great factor in images because if an image is taken in with a low resolution (like a flip phone or an old android tablet) then no matter what dpi the image is set to; it will come out in bad quality. In order to avoid that situation, designers should use only the most advanced camera for professionals, DSLR cameras. A DSLR’s resolution can go up to 50.6 megapixels for each photograph.

  Another important factor is the size of the computer’s monitor that any designer is  working on — which can alter the dpi of the image. For example, a monitor with the resolution of 1024×768 will have a dpi of 70. While in a monitor with a resolution of 1280×1024 would have a dpi of 87. This would result with a smaller image but with greater detail because of the density of pixels on the monitor or PPI (also known as Pixels per Inch.)

Later on in our multimedia class, we will have to know by prior knowledge when to use which types of DPIs which makes all of us just a little bit better.

To further comprehend the meaning and uses of DPI click here.

To explore more awesome pictures of this photographer seen in the featured image click here


The Pillars of Photography

The three pillars of photography are: ISO, aperture, and shutter speed

ISO

ISO is how sensitive a film is to light. However, since digital cameras do not use films to capture a photograph, ISO is fabricated. For DSLRs, ISO measures the sensitivity of the image sensor. The higher the ISO, the coarser the grain will show as shown below.

ISO.jpg

The ISO appears very faint in my photographs as a novice. On the top left it shows an ISO of 400 where there is little to no visible grains. The top right and bottom left show the progress of no grain to a lot of grain. Lastly, the bottom right shows an ISO of 12800; compared to to ISO 400, the grain is most visible on the edge of the rock.

Some things to consider on whether one should adjust the ISO is light, mood, tripod, and subject. For example, if you want you capture a picture of a flying bat in a low lit cave you need to: raise the ISO to create a spooooky mood and to have a nice exposure which would be balanced out with a high shutter speed to get the bat in mid-flight.

Aperture

Aperture is similar to an eye; the iris is what adjust how much light is being entered in the eye just as aperture does. It creates a blur in the background and emphasizes the focus of the subject. Below shows the different settings of aperture and how it effects the image.

Aperture.jpg

  It is clearly shown that larger (lens aperture), meaning the smallest number showcases how the background is blurred compared to the other three photographs. Keep in mind about the depth of field, which is the area of the image that appears sharp. The term f-stop comes from focal length and it expresses the ratio of the focal length to the aperture lens.

Shutter Speed

Shutter speed is the amount of time that the shutter is absorbing in light to capture an image. This is measured in seconds, hence the fractions displayed below. The smaller the fraction the faster the shutter speed is and therefore can catch in-the-moment photographs.

SHUTTER.jpg  
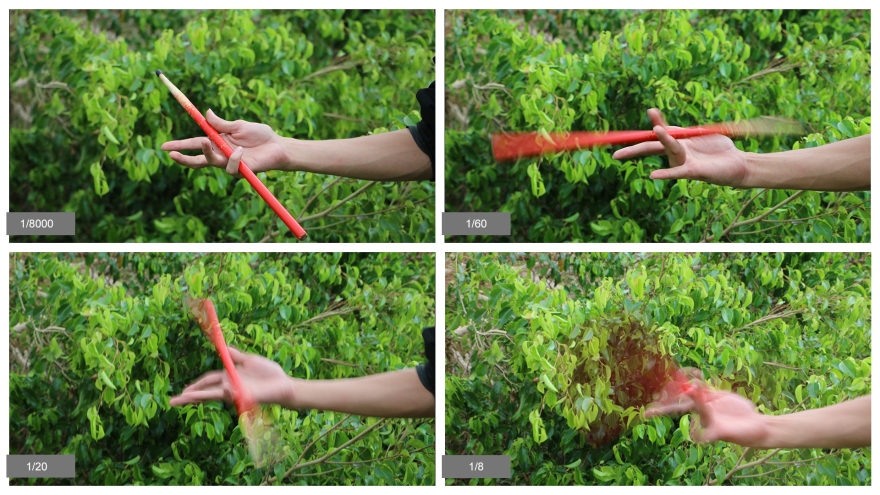
Using a shutter speed of 1/60 is recommended unless you are using a tripod. Otherwise, camera shake will ruin almost every shot because we are humans and cannot keep a camera still for more than one sixtieth of a second. Be creative when using slow shutter speed to an advantage to showcase things like waterfalls, and the zoomiest cars.

Photo by Jake Givens on Unsplash

Tripods, Grip & Holds

Tripods

Tripods are used to keep a camera leveled, stable and provide an overall professional look. For example, if you take a picture with a long shutter speed with out a tripod, the image will come out very blurry. This is due to the user of the camera not holding it still. However, using a tripod will keep the camera still and capture the subject’s movement. Tripods are very adjustable and can be go up to 5 feet high in landscape or six inches from the ground in portrait. It has three hinges on each leg to fix the leg according to the floor. Adjustable legs can prove useful in nature where there are rocks, roots and uneven land. One very helpful feature of a tripod is the leveler which shows whether the camera is parallel with the ground. Setting up your tripod can also help visualize the kind of image the user wants to create. By taking the time of thinking about framing, lighting, the subject, and settings of the camera, it will ensure to get the perfect picture the user is looking for.

Grip

Grips are used to improve the handling of the users camera. It provides a comfortable-feel and a better sense of security that the user won’t accidentally drop the camera. Often times DSLR are harder to hold with big lens. It is important that the user chooses whatever feels best. Certain grips use a rubber- like material with a rugged texture that essentially makes the camera non-slip unless you’re extremely clumsy.

Holds

As a photographer, knowing how to hold the camera is key to taking good photo. Not holding the camera properly would most likely result in a blurry photo (a.k.a. “camera shake”). When capturing a photograph in landscape, the user should keep their elbows close to their body ti support the weight of the camera. The users left hand should hold the lens of the camera to distribute the weight evenly. To take a picture in portrait orientation, the user should rotate the camera counter- clockwise by 90 degree. The right hand should hold the camera with the index finger laying on the shutter release button. The left hand should be, once again, be holding the camera lens. If the user needs to adjust and get lower to fit the whole subject, one can knee, squat,  or just sit on the ground as long as the user is stabilized and not in any danger from dropping the camera or falling onto it. An good tip is to make sure that the user keeps good posture and not lean forward or backward. Instead, lean on something solid to provide more stability to take better pictures with out having to rely on a tripod nor jazz hands.

Photo by Christy Ash on Unsplash