Offline vs. Real-Time Video Editing

There are several types of video editing in the industry of today. In this blog, I will be talking about offline video editing and real-time video editing. How are these two types of video editing different? How are they used in the industry?

Offline Video Editing

Offline video editing is used to eliminate to lag caused high-quality footage when editing in Premiere or After Effects. This is done by compressing the videos to a lower resolution to make it easier for the computer to handle. Once the editing is done, the low-resolution footage is replaced with the raw footage and viola, efficiency over 9000!

This type of editing was used since the good ol’ days with film! As time passed, offline editing became popular because it was easier with the technology they had at the time. However, nowadays people do not often work ‘offline’. Technology greatly advanced over time, it is only used if the computer is not capable to handle raw footage.

In the industry, offline video editing is rarely used unless necessary. Due to advanced computer technology, offline editing is not necessary. However, it may possibly be used when raw footage is in 4K resolution.

Real-Time Video Editing

Real-time video editing is more common in the industry such as sports, music, and events. The best way to do this is with multiple cameras, to get the best shot of whatever it may be they are filming. For sports like hockey, multiple cameras are required to get the best quality. Still-shots work better for events like a piano concert and would only require one camera.

This type of video editing requires multiple CPU’s (computer processing unit), multiple gigabytes of RAM (random access memory) and high-powered hard drives. It is typically only professionally practiced. I believe it is very challenging because there is only one chance to get it right. However, to be efficient, camera work would be practiced to be precise and smooth.

How does this apply to me?

Personally, I will probably not use either form of video editing. This is because my computer has the power to render raw footage and I do not wish to pursue to be in the industry of live TV broadcasting. However, this is new knowledge to me and will one day serve to help me when I have a terrible computer or when I work with super duper high resolution! Thank you for reading my blog, and as always… let’s get this bread.

Photo by Jakob Owens on Unsplash

Bootstrap CSS!

What is a bootstrap? A bootstrap is a line of code that makes the framework for websites easier for developers. They are also used as templates for typography, buttons, tables, navigations, models, and several other functions. This makes web development ten times easier than starting from scratch. Having a template gives the coder a head start in developing the website.

Bootstraps prevent repetition between projects, add consistency to design and code between projects and between developers, quickly and easily prototype new designs and ensures cross-browser compatibility. Browsers like Google Chrome, Mozilla Firefox, Internet Explorer, Edge, Safari, and Opera are all compatible with the bootstrap. This makes it the website available to more people.

Another advantage of bootstraps is that they are responsive. This means that they adjust to whatever device is being viewed on like smartphones, tablets, laptops, and desktops. This is vital to every website because without a responsive website the UX and UI between the product and the user would be a disaster. It would look unorganized as if someone copy and pasted oversized graphic elements.

img_temp_website

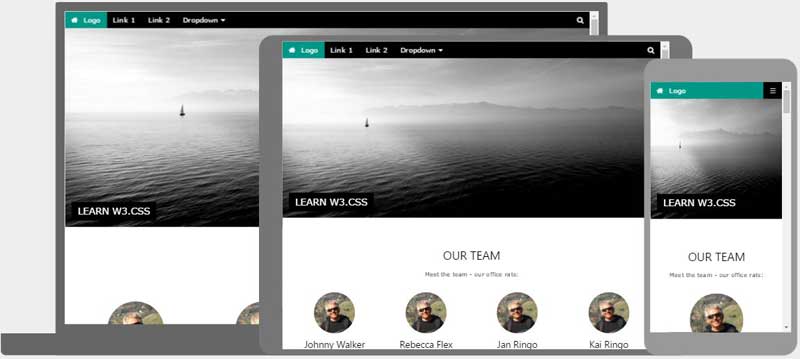
The image above shows an example of how a responsive website looks like. We have the Desktop, tablet, and mobile versions on the website adjusted by their dimension and resolution of the screen. As you can see the header is sized down according to the viewing device. It is also noticeable especially in the mobile version that the layout changed from profiles lined up horizontally versus in mobile where the profiles (circles) are lined up vertically.

One way to get bootstraps to create a website is through the website getbootstrap.com. This website allows any web developer to get a bootstrap to include in their work.  These shortcuts also have pre-styled components like dropdowns, button groups, navigation bar, breadcrumbs, labels, badges, alerts, progress bar, and several others.

Essentially, bootstraps are shortcuts of code in HTML and CSS; instead of typing fifteen lines of code, it could be shortened to three with the power of the bootstrap!

Why is Bootstrap so popular?

I believe bootstrap is popular because of the possibilities it is capable of. The templates Bootstrap provides can be altered to be one of a kind. Making a website could take only a matter of minutes, while at the same time visually look modern unlike former ways of building websites. Web Responsiveness is also another factor that makes web developing a lot easier which is why it is so popular.

Photo by David Rangel on Unsplash

5 Audio Design Jobs

Audio design is an essential aspect when it comes to games, video, and several other projects requiring sound. Sound can bring something dull to life. It is a powerful tool that makes everything 10x better! Here are five jobs that have to do with audio design.

Technical Sound Designer

The Technical sound designer is responsible for all the sound effects including the following: music, sound effects, and sound design. Collaboration between other composers and sound designers to have consistent sounds throughout the project. Qualification includes excellent communication and organization skills. Salary is between $50,000 and $71,000 a year.

Audio-Visual Production Specialist

This job is in charge of adjusting and working with a variety of audio and video equipment. This job requires a lot of forethought on how they plan to take the shot, set up the lighting and several other tasks. It also takes a lot of knowledge about the equipment being used. To reach a higher level, it is recommended to earn a bachelors degree. Experience is also key to going up in the chain. Despite everything an audio-visual production specialist has to do, the median annual salary is only around $46,000.

Audio Programmer

Similar to what some of my colleagues will be doing next week, an audio programmer is responsible for “the processing, storage, and playback of sound effects and music in the game” according to music-jobs.com. They also must know about several programming software including Max/MSP, Java, and C/C++. In simpler terms, audio programmers use code to play certain sound effects depending on what the player is doing, or where the character in the game is and several other factors. The annual salary can reach up to $102,000!

Audio Engineer

Audio Engineers create, edit, and record sounds. How awesome is that! Click here to watch an interesting video about audio engineers and how they create sounds using materials you’d never think of! As an audio engineer, it is important to be familiar with audio equipment like soundboards, equalizers, microphones recording equipment and software. Their median annual salary is $53,330.

Sound Technician

A sound technician usually works uncover at live events like concerts and other stage performances. They are in charge of the sound quality, volume, and equipment. Soundchecks are when their part of the job comes in. After, it is just a matter of perfecting the sound to reach the ultimate quality. A sound technicians annual salary is around $63,340.

Photo by Enoc Valenzuela on Unsplash

UI & UX

UI and UX elements are essential to a product and depend on each other. UX design leans towards the analytical and technical field while UI design relates to graphic design. However, the responsibilities of both UI and UX are complex.

To put it in a simpler way to understand, UX are the essential components in a tree like its cells and UI would represent the “design” of the plant (appearance). Its appearance correlates to its structure to get what it needs to survive like sunlight and water.

UX

To start off, UX stands for User Experience.  As stated in careerfoundry.com, the process of enhancing customer satisfaction and loyalty by improving the usability, ease of use, and pleasure provided in the interaction between the customer and the product.  UX design covers everything that is used on the customer’s en provided by the product. UX design is improved through research and continuous testing. UX’s responsibility can be divided into three categories according to careerfoundry’s: Strategy and Content, Wireframing and Prototyping, and Execution & Analytics. To get into further detail, here is a list of what each category consists of.

Strategy & Content

  • Competitor Analysis
  • Customer Analysis
  • Product Sttructure
  • Content Development

Wireframing &Prototyping

  • Wireframing
  • Prototyping
  • Testing/Iteration
  • Development Planning

Execution & Analytics

  • Coordination with UI Designers
  • Coordination with Developers
  • Tracking Goals and Integration
  • Analysis and Iteration

UI

UI stands for User Interface. Its purpose is to make it effective and pleasant to use. It is all about the look and feel. UI delves more into graphic design and interactivity with websites and apps and several other elements.

User Interface design is responsible for the transference of a product’s development, research, content, and layout into an attractive, guiding and responsive experience for users. According to my citations, UI can be divided into two categories: Design and Interactivity.

Design

The design aspect of UI involves customer analysis, design research, branding and graphic development, and most importantly a storyline. Customer analysis allows the graphic developer to fix whatever is necessary to achieve an efficient product while design research is done to find what sort of style should be considered in making the product. The storyline is the plan of attack when it comes to designing and branding the product.

Interactivity

The interactive responsibility is very important because even though it may look pretty, it will not work. Interactivity consists of: animation, web responsiveness, and prototyping.

A wise man once said, “A great product experience starts with UX followed by UI.”

If you want to learn more about UI click here.

If you would like to expand your knowledge on  UI click here.

Photo by Nic Low on Unsplash

Raster vs. Vectors

Raster

Raster images are made of millions of pixels. An image can be identified as a raster image if you zoom in enough to where tiny squares (pixels) are visible. Using raster images are most useful when editing images. This is a because vectors can not be touched up to make a better quality image. Smoothed edges and transitions between colors make raster images look better compared to a vector image. Raster images are also used for websites to showcase whatever purpose they are trying to achieve.  When painting with pixels, it gives a feathered transition from the foreground to the background. If a gradient of the all the colors were to be made with no vectors, it would look like a rainbow. However if a gradient were to be made with all the colors with vectors, it would look like stripes of colors like the ten year old colored a rainbow with no blending.

  Overall,  raster images are meant for editing photographs, drawing or painting on Adobe Photoshop, and for using effects to perfect images with even the smallest details.

Vector

Vectors are created with paths. Paths are curves and lines that form whatever shape or design is being created. The outlook of a vectorized painting for example would look like a simplified version because it what happens during the process is that the software recognizes all the color and creates a shape for each of them. Therefore, it would have hard edges between colors unlike an original painting were colors are smoothly blended in. Software like Adobe Illustrator are specifically created to create vectors. Adobe Photoshop also creates vectors. However, Photoshop is not as versatile as Illustrator. Vectors and paths use algorithmic curvatures and does not depend on resolution. Vector shapes can be resized from the size of a coin to a billboard without showing any kind of pixel problem. Compared to rasterized images, vectors are efficient in saving space because it uses formulas to save the file instead of pixels like rasterized images.

  Designs like logos should always be created with vectors. This is because you never know  when you need to resize your logo for a flyer, a website, business card, a poster, or even a billboard! If you try to size up or expand a logo that is rasterized it will come out pixelated with a very low resolution.

Photo by Ari He on Unsplash

72dpi vs. 300dpi

After a few guesses of attempting to guess what dpi stands for I’ve concluded that it is an abbreviation for Dog Pee Incidents. However, the intellectual internet has yet again taught me something new; Dpi stands for dots per inch.

What’s Dpi?

Dots per inch refers to the print on posters, banners, and several other printable objects that use dots of ink per inch to determine the quality of a printed image. In simpler terms, the higher the dpi the more detail would show in the finished printed product.

DPIs used for Printing and Web

The DPI may have to be altered depending on how the designer will exhibit his or her work. If the designer chooses to print their work, they must use a DPI of at least one hundred and fifty (typically three hundred.) It is important to have a  high dpi otherwise suffering of one’s self is guaranteed due to the poor quality If the designer chooses it to add their image on a blog it would be ideal to use a DPI of 72.  This is because it is considered the standard dpi for web images.

  Resolution also plays a great factor in images because if an image is taken in with a low resolution (like a flip phone or an old android tablet) then no matter what dpi the image is set to; it will come out in bad quality. In order to avoid that situation, designers should use only the most advanced camera for professionals, DSLR cameras. A DSLR’s resolution can go up to 50.6 megapixels for each photograph.

  Another important factor is the size of the computer’s monitor that any designer is  working on — which can alter the dpi of the image. For example, a monitor with the resolution of 1024×768 will have a dpi of 70. While in a monitor with a resolution of 1280×1024 would have a dpi of 87. This would result with a smaller image but with greater detail because of the density of pixels on the monitor or PPI (also known as Pixels per Inch.)

Later on in our multimedia class, we will have to know by prior knowledge when to use which types of DPIs which makes all of us just a little bit better.

To further comprehend the meaning and uses of DPI click here.

To explore more awesome pictures of this photographer seen in the featured image click here


The Pillars of Photography

The three pillars of photography are: ISO, aperture, and shutter speed

ISO

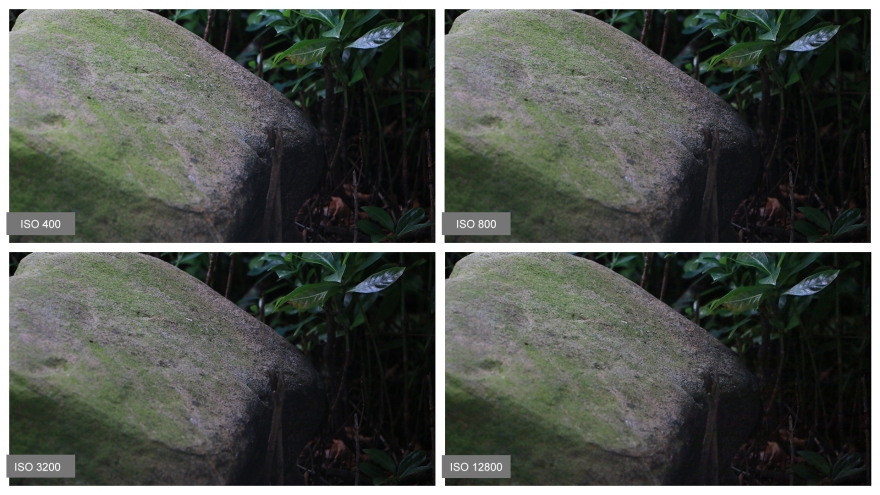
ISO is how sensitive a film is to light. However, since digital cameras do not use films to capture a photograph, ISO is fabricated. For DSLRs, ISO measures the sensitivity of the image sensor. The higher the ISO, the coarser the grain will show as shown below.

ISO.jpg

The ISO appears very faint in my photographs as a novice. On the top left it shows an ISO of 400 where there is little to no visible grains. The top right and bottom left show the progress of no grain to a lot of grain. Lastly, the bottom right shows an ISO of 12800; compared to to ISO 400, the grain is most visible on the edge of the rock.

Some things to consider on whether one should adjust the ISO is light, mood, tripod, and subject. For example, if you want you capture a picture of a flying bat in a low lit cave you need to: raise the ISO to create a spooooky mood and to have a nice exposure which would be balanced out with a high shutter speed to get the bat in mid-flight.

Aperture

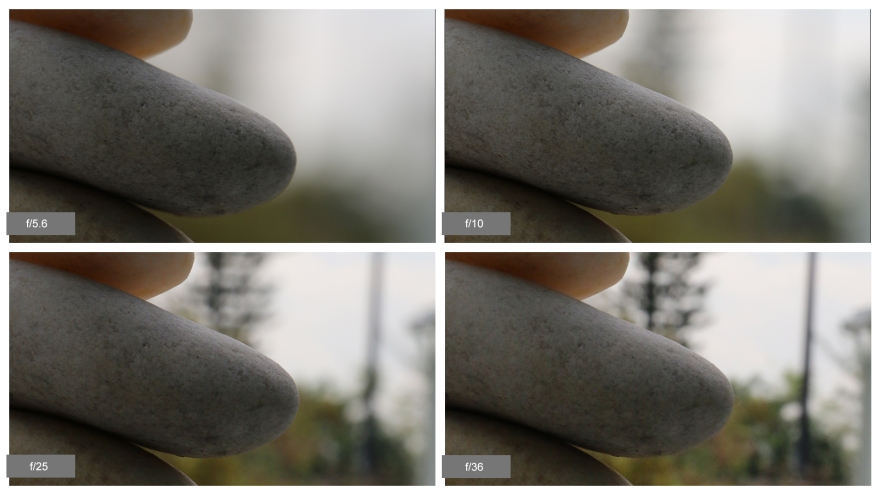
Aperture is similar to an eye; the iris is what adjust how much light is being entered in the eye just as aperture does. It creates a blur in the background and emphasizes the focus of the subject. Below shows the different settings of aperture and how it effects the image.

Aperture.jpg

  It is clearly shown that larger (lens aperture), meaning the smallest number showcases how the background is blurred compared to the other three photographs. Keep in mind about the depth of field, which is the area of the image that appears sharp. The term f-stop comes from focal length and it expresses the ratio of the focal length to the aperture lens.

Shutter Speed

Shutter speed is the amount of time that the shutter is absorbing in light to capture an image. This is measured in seconds, hence the fractions displayed below. The smaller the fraction the faster the shutter speed is and therefore can catch in-the-moment photographs.

SHUTTER.jpg  Using a shutter speed of 1/60 is recommended unless you are using a tripod. Otherwise, camera shake will ruin almost every shot because we are humans and cannot keep a camera still for more than one sixtieth of a second. Be creative when using slow shutter speed to an advantage to showcase things like waterfalls, and the zoomiest cars.

Photo by Jake Givens on Unsplash

File Types

EPS

This file format is used in vector based images in Adobe Illustrator. EPS stands for Encapsulated Post Script. Its purpose is specifically to open in Adobe Illustrator which contains text and graphics.

PDF

Portable Document Format file, (also known as PDF) is usually used for saving documents like fill- out forms online. Fortunately, it can be viewed on multiple programs and software. This includes: Google Chrome, Bing, Adobe Acrobat Reader, and Firefox. However, it can only  be edited in Adobe Acrobat Reader.

TIFF

TIFF, meaning Tag Imagine File Format, is responsible for switching raster graphics images back and forth through application programs. TIFFs are commonly used in faxing, medical imaging, 3D application, and desktop publishing.

JPEG

JPEG is a common file extension to save images. If a PNG file with transparency were to be saved as a JPEG, the transparency would not be recognized and would be replaced into white.

PNG

The file format extension, Portable Network Graphics, is designed specifically for network image data transmission and storage. Nowadays, PNGs are used to replace GIFs. GIFs show animations like a stick man doing the macarena.

Image result for macarena gif

ASCII

 ASCII is synonymous to the file format extension, .txt. Its purpose is to show text that can be used in any word processor or text editor.

MPEG

Moving Picture Experts Group is the extension of MPEG. As the name suggests, it is a video file that is compressed (to occupy less space in bytes.) Since it doesn’t take up as much space, it is used for downloading and streaming movies.

MIDI

MIDI is used for professional audio for making music that is supported by computer sound cards. MIDI is specifically used to add synthesizers to control: note- ons, note- offs, tempo, pitch, and voice of a song. However, technically there are limited options when it comes to adding a synth to a song. One advantage is that it it compressed to a very small file size. MIDI stands for Musical Instrument Digital Interface.

AV

AV is an Audio Visual Document file. It can also be recognized as .XAV or .XAVT. This file format is used to contain the script.  It makes the process of adding dialogue, scenes, character info, actions, emotions, and acting tips that are necessary for a script. Accessing AV files is easy; All you have to do is open it in Notepad provided by both Macs and Windows or by Final Draft AV software.

WAV

Waveform Audio Format is considered a raw audio format. Depending on what type of music is being recorded, WAV formats are more often used for non- digital music. One disadvantage is that it is uncompressed, meaning it is not sized down to a smaller size (in bytes.)

Photo by Hanny Naibaho on Unsplash

Tripods, Grip & Holds

Tripods

Tripods are used to keep a camera leveled, stable and provide an overall professional look. For example, if you take a picture with a long shutter speed with out a tripod, the image will come out very blurry. This is due to the user of the camera not holding it still. However, using a tripod will keep the camera still and capture the subject’s movement. Tripods are very adjustable and can be go up to 5 feet high in landscape or six inches from the ground in portrait. It has three hinges on each leg to fix the leg according to the floor. Adjustable legs can prove useful in nature where there are rocks, roots and uneven land. One very helpful feature of a tripod is the leveler which shows whether the camera is parallel with the ground. Setting up your tripod can also help visualize the kind of image the user wants to create. By taking the time of thinking about framing, lighting, the subject, and settings of the camera, it will ensure to get the perfect picture the user is looking for.

Grip

Grips are used to improve the handling of the users camera. It provides a comfortable-feel and a better sense of security that the user won’t accidentally drop the camera. Often times DSLR are harder to hold with big lens. It is important that the user chooses whatever feels best. Certain grips use a rubber- like material with a rugged texture that essentially makes the camera non-slip unless you’re extremely clumsy.

Holds

As a photographer, knowing how to hold the camera is key to taking good photo. Not holding the camera properly would most likely result in a blurry photo (a.k.a. “camera shake”). When capturing a photograph in landscape, the user should keep their elbows close to their body ti support the weight of the camera. The users left hand should hold the lens of the camera to distribute the weight evenly. To take a picture in portrait orientation, the user should rotate the camera counter- clockwise by 90 degree. The right hand should hold the camera with the index finger laying on the shutter release button. The left hand should be, once again, be holding the camera lens. If the user needs to adjust and get lower to fit the whole subject, one can knee, squat,  or just sit on the ground as long as the user is stabilized and not in any danger from dropping the camera or falling onto it. An good tip is to make sure that the user keeps good posture and not lean forward or backward. Instead, lean on something solid to provide more stability to take better pictures with out having to rely on a tripod nor jazz hands.

Photo by Christy Ash on Unsplash

Types of Digital Cameras

Standard Compact

These cameras are simple and cheap that provide bad quality compared to DSLR cameras. Most Standard Compact cameras are completely automatic and do not allow settings to be changed manually. They have a 4 to 10x zoom lens with an LCD screen. These types of cameras usually range from $85 to $400. The more expensive versions probably include more features like high definition video and better quality.

Zoom Compact

Zoom Compact cameras are almost the same as standard compact except they have a better zoom lens. These cameras can go up to 30x. Typically, they are larger than standard compacts due to their bigger zoom lens. Some of them have a manual mode which is a big step up from standard compact cameras.

Advanced Compact

Advanced Compact cameras have a more features than a zoom compact because they have several manual mode that allow more control in taking photos. However, it is limited compared to DSLR cameras. It also does not allow to change the camera lens. The price range of Advanced Compact cameras are between $400 to over $1000 depending whether you chose to have small or large sensors.

Compact (Mirror-less) System

Compact system cameras are second to one of the best choices for a professional photographer. Mostly, because they’re lighter in weight compared to DSLR cameras and are able to change lenses like professional cameras. Overall, Compact System cameras have good quality (but not the best), are light-weight, small, and a bit less expensive than DSLR cameras.

DSLR

By far, professional photographers chose the DSLR camera over all of the others simply due to the lack of quality and features they offer. DSLR stands for Digital Single-Lens Reflex. This means that it uses a mirror and a prism to form an accurate photo which saves the image digitally on an SD card.

Because our multimedia program uses DSLR cameras, I will expand on information about these cameras. First, is the Power Switch which allows to turn the camera on and off. It is typically located on the top of the camera. Usually, it surrounds the shutter release button which is used to take photos! Remember to lightly press it for the camera to focus on the subject in the photo. The exposure compensation-aperture button controls shutter speed and can control aperture by simply holding down the button when in manual mode. Otherwise, it makes the image appear brighter or darker depending on what the user sets it on while the camera itself adjusts every other setting. The mode dial is used to set the user’s camera to whatever shooting mode they want. The modes that all DSLR cameras include Program, Shutter Priority, Aperture Priority, and Manual. Some even include a mode called Auto which does everything for you for casual shooting. But auto is for noobs, it’s all about manual mode.

There are a lot more features to be explained but because I ran out of words I’m gonna stop now.

Photo by Siddharth Bhogra on Unsplash