Offline vs. Real-Time Video Editing

There are several types of video editing in the industry of today. In this blog, I will be talking about offline video editing and real-time video editing. How are these two types of video editing different? How are they used in the industry?

Offline Video Editing

Offline video editing is used to eliminate to lag caused high-quality footage when editing in Premiere or After Effects. This is done by compressing the videos to a lower resolution to make it easier for the computer to handle. Once the editing is done, the low-resolution footage is replaced with the raw footage and viola, efficiency over 9000!

This type of editing was used since the good ol’ days with film! As time passed, offline editing became popular because it was easier with the technology they had at the time. However, nowadays people do not often work ‘offline’. Technology greatly advanced over time, it is only used if the computer is not capable to handle raw footage.

In the industry, offline video editing is rarely used unless necessary. Due to advanced computer technology, offline editing is not necessary. However, it may possibly be used when raw footage is in 4K resolution.

Real-Time Video Editing

Real-time video editing is more common in the industry such as sports, music, and events. The best way to do this is with multiple cameras, to get the best shot of whatever it may be they are filming. For sports like hockey, multiple cameras are required to get the best quality. Still-shots work better for events like a piano concert and would only require one camera.

This type of video editing requires multiple CPU’s (computer processing unit), multiple gigabytes of RAM (random access memory) and high-powered hard drives. It is typically only professionally practiced. I believe it is very challenging because there is only one chance to get it right. However, to be efficient, camera work would be practiced to be precise and smooth.

How does this apply to me?

Personally, I will probably not use either form of video editing. This is because my computer has the power to render raw footage and I do not wish to pursue to be in the industry of live TV broadcasting. However, this is new knowledge to me and will one day serve to help me when I have a terrible computer or when I work with super duper high resolution! Thank you for reading my blog, and as always… let’s get this bread.

Photo by Jakob Owens on Unsplash

Bootstrap CSS!

What is a bootstrap? A bootstrap is a line of code that makes the framework for websites easier for developers. They are also used as templates for typography, buttons, tables, navigations, models, and several other functions. This makes web development ten times easier than starting from scratch. Having a template gives the coder a head start in developing the website.

Bootstraps prevent repetition between projects, add consistency to design and code between projects and between developers, quickly and easily prototype new designs and ensures cross-browser compatibility. Browsers like Google Chrome, Mozilla Firefox, Internet Explorer, Edge, Safari, and Opera are all compatible with the bootstrap. This makes it the website available to more people.

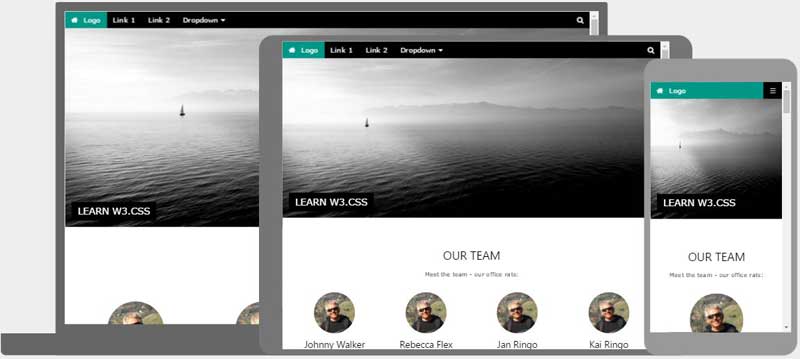
Another advantage of bootstraps is that they are responsive. This means that they adjust to whatever device is being viewed on like smartphones, tablets, laptops, and desktops. This is vital to every website because without a responsive website the UX and UI between the product and the user would be a disaster. It would look unorganized as if someone copy and pasted oversized graphic elements.

img_temp_website

The image above shows an example of how a responsive website looks like. We have the Desktop, tablet, and mobile versions on the website adjusted by their dimension and resolution of the screen. As you can see the header is sized down according to the viewing device. It is also noticeable especially in the mobile version that the layout changed from profiles lined up horizontally versus in mobile where the profiles (circles) are lined up vertically.

One way to get bootstraps to create a website is through the website getbootstrap.com. This website allows any web developer to get a bootstrap to include in their work.  These shortcuts also have pre-styled components like dropdowns, button groups, navigation bar, breadcrumbs, labels, badges, alerts, progress bar, and several others.

Essentially, bootstraps are shortcuts of code in HTML and CSS; instead of typing fifteen lines of code, it could be shortened to three with the power of the bootstrap!

Why is Bootstrap so popular?

I believe bootstrap is popular because of the possibilities it is capable of. The templates Bootstrap provides can be altered to be one of a kind. Making a website could take only a matter of minutes, while at the same time visually look modern unlike former ways of building websites. Web Responsiveness is also another factor that makes web developing a lot easier which is why it is so popular.

Photo by David Rangel on Unsplash

CD vs MPPM

Creative Director (CD)

A Creative Director has to do more with advertising and marketing products. They work with designers and artists to guide them to get the desired outcome of what the Creative Director envision. On the business side, CD’s work with sales teams and marketers.

In most cases, creative directors earn a bachelor’s followed by several years of experience.

Some skills that a creative director must have is leadership, decision-making skills, and analytical. These three qualities make up a proper creative director. Leadership in order to manage the team in the right direction. Decision making because the CD eventually has to make the final choice for the final product. Lastly,  analytical skills to assure everything is perfect from artwork to data.

The annual median income for CD’s in 2010 was around $108,260. That’s pretty good in my eyes. However, it’ll take a while to get there.

Multimedia Production Project Manager (MPPM)

This job is no joke. It takes a lot of perseverance and determination from beginning to end.  Multimedia covers radio, television, and several other mediums. They are also in charge of “organizing schedules, budgets, and people… from initial planning, estimating and scheduling, through filming or recording, and on to final budget and production reports.” according to Ian Linton. Basically, they are the head of the project. Without a multimedia production project manager, everything would fall apart and nothing would get done.

There are some tough qualifications to reach this position. Experience and leadership are two requirements to be a multimedia production project manager. An MPPM must have experience in every part of the process required in a project. Knowledge is power. What is most important is familiarity with production like lighting, filming, recording, and editing. Being an MPPM does not technically require a bachelor’s degree, but it would look good otherwise.

The median annual salary of a multimedia production project manager varies between the type of industry. For example, Motion Picture industry earns around $92,820 a year for a PM while those in radio and television only work up to an annual $54,120. One tip to earning a lot of money is git good.

Comparison

Both CD and MPPM require leadership. Another similarity is that both titles require experience. Someone can’t just get a degree and start working as a CD/MPPM. They have to work their way up. On the other hand, Creative Directors work more with advertising than a multimedia production project manager does.

Format for Animated Web Banners

If you’re reading this you have probably seen a web banner. Maybe there’s one on this screen at this very moment. Try hovering over it. Does it have a loop if it is left untouched? Depending if it is a good web banner it would have a; seamless loop, hover animation, and a call to action. There are six things to take into consideration in making an animated web banner: responsiveness, animation, file size, design unity, simplicity, and eye-catching.

Responsiveness

Having a fully functional responsive web banner is very significant because it allows the potential customer to at least look at the web banner. Perfect responsiveness creates a professional look with out bothering the potential customers.

Animation

Never ever put too much animation in a web banner or else it will annoy the viewer of the website and (1.) drive the viewer off the website and most important (2.) not want the viewer to click on the web banner out of suspicion it will cause a virus or possibly because the web banner is terrible. Less is more; even a slight animation is enough to attract the viewer’s eyes to the ad.

File Size

Careful now, file size is super important. I doubt anyone is willing to wait for an ad to load unless you’re the creator of the web banner. File size should always be kept to a minimum so it loads on to the web page easily and rapidly. One way to do this is to keep your frame rate to 24. However, if your web banner does not have many elements it would be acceptable to use 29 FPS (frames per second) which is supported by Google.

Design Unity

The design of your web banner must be similar to the website or landing page in order to prevent confusion to the potential customer. If the design of the web banner does not match the website, then you’re a bad designer! Sorry to break it to you, it’s not variety that you want, it is the repetition of elements with the product and designs of all platforms. If you’re still confused, look up the Joshua Tree of Design.

Simplicity

The final design should be simple and not overcrowded. Too much information can be overwhelming to the viewer and will make it harder to pick out the purpose of the ad and what it is exactly.

Eye-Catching

Try making a web banner that is clever. Thoroughly think about your web banner. Plan out what kind of animations you want to use. Create a storyboard to help visualize the web banner.

To learn more click here

Photo by Serge Kutuzov on Unsplash

User Testing

There are five popular testing methods: usability testing, focus groups, beta testing, A/B testing, surveys. Each type of method has its own purpose but come down to the same area of testability and satisfactory of users in websites.

Usability Testing

Usability testing consists of trials of legit users to test the product to see if it is actually usable. Usability testing is the best way to understand how real users experience your website or app. It is also easy to acquire new information the user might say or even through the users’ actions can the product be more efficient for the end result. Usability testing falls under the category of UX otherwise known as User Experience which follows almost the same testing as does usability testing. To learn more about UX, click here!

Focus Groups

Focus groups are a tried and true method of communication between a researcher and users. In a focus group, you bring together 6 to 12 users to discuss issues and concerns about the features of a User Interface (otherwise known as UI, the design aspect of the website/product.)The group typically lasts about 2 hours and is run by a moderator who maintains the group’s focus by asking a series of questions and allows users to give important feedback. It is also important to note that focus groups cost money, but in the long run, it will be all worth it.

Beta Testing

Beta testing allows you to roll out a near-complete product to individuals who are happy to try it and provide critical feedback. This testing method allows you to ask users questions after they have the new product, track their usage and have them file bug reports. Beta testing can take a ton of hours from each user to make sure there are no bugs left in the website/product.

A/B Testing

An A/B test is ideal as the appropriate testing method when designers are struggling to choose between two competing elements. This testing method consists of showing one of two versions randomly to an equal number of users and then reviewing analytics on which version accomplished a specific goal more effectively.

Surveys

Questionnaires and surveys are an easy way to gather a large amount of information about users, with minimal time invested. A researcher can create a survey using tools like WufooSurveyMonkey or Google Forms, send it out, and receive hundreds of responses in just minutes.

To learn more about the methods of User Testing, click here.

Photo by Ryan Wallace on Unsplash


UI & UX

UI and UX elements are essential to a product and depend on each other. UX design leans towards the analytical and technical field while UI design relates to graphic design. However, the responsibilities of both UI and UX are complex.

To put it in a simpler way to understand, UX are the essential components in a tree like its cells and UI would represent the “design” of the plant (appearance). Its appearance correlates to its structure to get what it needs to survive like sunlight and water.

UX

To start off, UX stands for User Experience.  As stated in careerfoundry.com, the process of enhancing customer satisfaction and loyalty by improving the usability, ease of use, and pleasure provided in the interaction between the customer and the product.  UX design covers everything that is used on the customer’s en provided by the product. UX design is improved through research and continuous testing. UX’s responsibility can be divided into three categories according to careerfoundry’s: Strategy and Content, Wireframing and Prototyping, and Execution & Analytics. To get into further detail, here is a list of what each category consists of.

Strategy & Content

  • Competitor Analysis
  • Customer Analysis
  • Product Sttructure
  • Content Development

Wireframing &Prototyping

  • Wireframing
  • Prototyping
  • Testing/Iteration
  • Development Planning

Execution & Analytics

  • Coordination with UI Designers
  • Coordination with Developers
  • Tracking Goals and Integration
  • Analysis and Iteration

UI

UI stands for User Interface. Its purpose is to make it effective and pleasant to use. It is all about the look and feel. UI delves more into graphic design and interactivity with websites and apps and several other elements.

User Interface design is responsible for the transference of a product’s development, research, content, and layout into an attractive, guiding and responsive experience for users. According to my citations, UI can be divided into two categories: Design and Interactivity.

Design

The design aspect of UI involves customer analysis, design research, branding and graphic development, and most importantly a storyline. Customer analysis allows the graphic developer to fix whatever is necessary to achieve an efficient product while design research is done to find what sort of style should be considered in making the product. The storyline is the plan of attack when it comes to designing and branding the product.

Interactivity

The interactive responsibility is very important because even though it may look pretty, it will not work. Interactivity consists of: animation, web responsiveness, and prototyping.

A wise man once said, “A great product experience starts with UX followed by UI.”

If you want to learn more about UI click here.

If you would like to expand your knowledge on  UI click here.

Photo by Nic Low on Unsplash

Landing Pages: Tolerable vs. Terrible

After attempting to create a landing page on my own I learned several things. My text was oversized, as well as everything else: icons and graphics. Another flaw I was told by a very experienced designer suggested keeping my information to a minimum. The purpose is to download the app. It does not require a whole website based on the app.It is only a landing page!

If you are new to Adobe Muse or website making, in general, I recommend using a UI/ UX (user experience) template to get a sense of what sizes to make the font for desktop and scale down for tablet and mobile version.

It is important to make sure the user does not get distracted by the landing page. Too much information will result in a confused potential customer and maybe even lose the user from downloading the app. It is easy to mislead yourself from thinking your font is too small for the desktop version of the landing page. DONT MAKE IT BIGGER. Huge mistake buddy, Keep your font size under 60 unless you’re doing something design-wise.

Tolerable

Here is a list of qualities a landing page is recommended.

  • Functioning download buttons
  • Responsive web page (desktop, tablet, mobile)
  • Showcase application
  • 44pt to 18pt font from headings to paragraphs
  • Animations
  • Little text
  • Graphics
  • Joshua Tree (Contrast, Repetition, Alignment, Proximity)
  • Functioning Call to Action
  • Color scheme (Analogous, Complimentary,  Monochromatic)
  • Focuses on downloading app

Terrible

Here is a list of things you should not do in a landing page.

  • Make a whole website dedicated to the app
  • Unresponsive/ broken breakpoints
  • Oversized text
  • Too much test
  • Non-web responsive fonts (acts as an image)
  • Clutter of any kind
  • Broken Call to Action
  • Too many colors
  • Too much information
  • Poor use of Joshua Tree

Examples

View these sample landing pages by clicking this link here to get a better understanding of tolerable and terrible landing pages. Click here to see my own landing page for my Trax app.

Photo by Dan Gold on Unsplash

Bootstrap CSS

A bootstrap is a line of code that makes the framework for websites easier for developers. They are also used as templates for typography, buttons, tables, navigations, models, and several other functions. Bootstraps prevent repetition between projects, add consistency to design and code between projects and between developers, quickly and easily prototype new designs and ensures cross-browser compatibility. Another advantage of bootstraps is that they are responsive. This means that they adjust to whatever device is being viewed on like smartphones, tablets, laptops, and desktops. Ome way to get bootstraps to create a website is through the website getbootstrap.com. This website allows any web developer to get a bootstrap to include in their work.  These shortcuts also have pre-styled components like dropdowns, button groups, navigation bar, breadcrumbs, labels, badges, alerts, progress bar, and several others.

Essentially, bootstraps are shortcuts of code in HTML and CSS; instead of typing fifteen lines of code, it could be shortened to three with the power of the bootstrap! Here is an example of a bootstrap being used for accommodating to different electronic devices that are accessible to the internet.

When creating a page layout for websites it is essential to use the grid system which allows the creator to easily make a website with efficiency.

  • “Rows must be placed within a .container (fixed-width) or .container-fluid (full-width) for proper alignment and padding.
  • Use rows to create horizontal groups of columns.
  • Content should be placed within columns, and only columns may be immediate children of rows.
  • Predefined grid classes like .row and .col-xs-4 are available for quickly making grid layouts. Less mixins can also be used for more semantic layouts.
  • Columns create gutters (gaps between column content) via padding. That padding is offset in rows for the first and last column via negative margin on .rows.
  • The negative margin is why the examples below are outdented. It’s so that content within grid columns is lined up with non-grid content.
  • Grid columns are created by specifying the number of twelve available columns you wish to span. For example, three equal columns would use three .col-xs-4.
  • If more than 12 columns are placed within a single row, each group of extra columns will, as one unit, wrap onto a new line.
  • Grid classes apply to devices with screen widths greater than or equal to the breakpoint sizes, and override grid classes targeted at smaller devices. Therefore, e.g. applying any .col-md-* class to an element will not only affect its styling on medium devices but also on large devices if a .col-lg-* class is not present.”

These key points to starting a website are from the website itself that makes bootstraps, https://getbootstrap.com/docs/3.3/css/#overview.

Photo by Ryan Everett on Unsplash

Design Strategies for Websites

Website designing requires a lot of planning. The goal of designing a website is to create a public interface that is not only pleasing to the eye but also creates easy and self-explanatory access to its content. In order to achieve this, one must think about typography, layout, photos.  Use the elements of web design to help forge a website. Along with design, the functionality of a website is essential; I would say it is more important because there is no purpose of a website if it does not work. There are six steps to strategically thinking about designing a website.

1.Establish your objectives

Before designing and tediously typing code, make checkboxes to be organized and clear about goals. This builds a strong relationship between the client and the web designer. Ask several questions like: What are you trying to achieve with the new website or redesign? What is the website’s main purpose? These types of questions should be discussed and made unambiguous.

2.Identify your Target Audience

Customer demographics can alter and form how a website is designed. Things like age, gender, and opinions of whatever might influence a website’s information or design. For more information about target audiences for websites, click here.

3.Determine your Brand Image

Find out what kind of theme the website will be. A bad graphic designer would take “inspiration” and copy it word for word. Instead, think about color, and the feel that is trying to be conveyed. This also applies to typography and every design aspect.

4. Syncing goals with design

Now that objectives and design themes have been thoroughly reflected, it is time to put it into action. Use color and contrast to make the website pop-out for a lack of a better term. Keep the website clear and concise so that it will be easy for the public to use.

5. Measure Results

This step tells a designer how well the design platforms are. If not, then it would not be known if the website is effective in fulfilling the objectives specified in the first step. To measure your results you need feedback from users of the website. Look for repeated issues that come up from the feedback to fix.

6. Revise

There is no harm in fixing a few details to make the website better. And there is always a way to make improvements to make the website more functional and better looking.

https://www.smashingmagazine.com/2008/11/strategic-design-6-steps-for-building-successful-websites/

Photo by Sacha Styles on Unsplash